I get asked a lot if you can make an HDR photo from a single raw file. My answer is sure you can! I've created some pretty nice HDR photos from a single Raw (NEF) file. I know a lot of HDR purest out there will disagree and say that’s not real HDR but that's OK, it still works and looks great…So I’m going to try to show you how to accomplish this. It's really easy!
Some might say why would you need to just use one raw file anyway? Well real HDR is done using your cameras bracketing. That’s 3 photos of the same subject bracketed, one underexposed, one overexposed, and one perfectly exposed. Like -150, +150, and 000 exposure values. The D90 can only do 3 shot bracketing but some other cameras can do 5 shoot bracketing. That’s all fine and dandy when your subject isn’t moving and you can set up your tripod and take 3 quick burst shots bracketed, but what if you want to HDR a moving subject or didn’t plan on doing a HDR photo and only have one raw image to use. That’s were this how to tutorial comes in handy. HDR (High Dynamic Range) from a single raw file.
This tutorial is my personal work flow to accomplish this technique. I’ll be using Photoshop Elements 10 with Adobe Raw and Dynamic HDR software. That’s all you’ll need. Adobe Raw is the main factor in this how to tutorial. Basically when you download your raw photos and go to full edit them in Elements, Adobe Raw opens first with your raw image. And this is where we will need to use the exposure slider to set your over and under exposures. So you will be opening the same image 3 times in adobe raw and saving each one as a different exposure. Each time you open your photo you’ll need to adjust the exposure slider and save as to your desktop. Once this has all been done it’s time for the fun stuff, using your HDR software. So lets get started.
Click on Images to see at full Size
 |
| #1 Open Elements Organizer, highlight your raw image and click Full Photo Edit. opening Adobe Raw. |
 |
| #2 Adobe Raw is now open, Exposure slider is at 0.00 just were we want it. Click Open Image. |
 |
| #3 This is what you should see after opening the image from adobe raw. |
 |
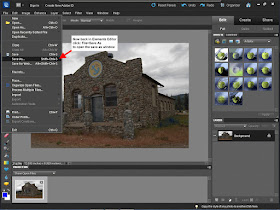
| #4 click file > Save as. File type |
 |
| #5 Once back open in Adobe Raw slide the exposure down to -150 and open image |
 |
|
#6 click file > Save as. File type |
 |
| #7 Once back open in Adobe Raw slide the exposure up to +150 and open image. |
 |
| #8 click file > Save as. File type |
Now it’s time to open your
 |
| #9 Open |
 |
| #10 Select your 3 images on your desk top. 000,-150,+150 and hit OK. |
The next window (below) will open and we need to do a few things here before we proceed. You should notice first that all three images are showing the same exposure value. So the first thing you need to do in this window is hit the Guess Exposure button. This will read the raw image data in display the correct exposures. Note: they might not read exactly 000, -150, and +150 but they should be close. Make sure the “Align Files in Next Step” is unchecked. We would only use this option if we used our camera to bracket 3 shoots and might need to align something like clouds. But since we are only using one image we don’t need to align anything. Once you have this all done go ahead and hit OK.
 |
| #11 Click Guess EV (exposure value), uncheck Align files in next step, Hit Ok. |
 |
| #12 Time to Tone Map your just created |
1. Dramatic Light Radius
2. Dramatic Light Strength
3. Surface Smoothness
I hope you'll give this a try! please let me know if I forgot something or you have a general question! I'm no english scholar so I hope my grammar wasn't too bad. lol
Books on HDR Photography you might be interested in:
Complete Guide to High Dynamic Range Digital Photography
HDR Photography Photo Workshop
Practical HDR
A World in HDR
High Dynamic Range Digital Photography For Dummies


You referred to using Adobe Raw with PSE 10. Is adobe RAW a plug-in for PSE 10 or a menu option or a stand alone adobe software product. I have PSE 9 but haven't yet explored its full menu set.
ReplyDeleteBen, Really to me Adobe Raw has always been a mystery! I never see it anywhere on my computer and thats since version 6 of elements lol. But it is always there when I go to edit a Raw (NEF) file in elements so I'm sure it will appear when you try the same in elements 9. Don't try finding it in elements menus its no where to be found....but it works when needed. I have seen other types of raw converters but haven't tried any...it is definitely a plugin but i do believe its already pre-plugged into elements.
ReplyDeleteThanks very much for the feedback Scbbbc. I will take a look tonight and let you know how I go. Cant wait to try this out, though i need to get the HDR software first.
ReplyDeleteThat's awesome, I can't wait to try this out.
ReplyDeleteGreat.
ReplyDeleteDxO optics pro have the HDR singls shot feature. It works very well and very easily !
ReplyDeleteYou can check on of my shots
Thanks for the tip Champigon!
ReplyDelete