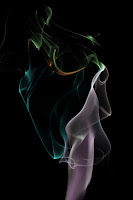
Stuck in the house on a rainy day? Try some smoke photography for some indoors fun! Do you see in the image a profile of an old sea mariner with his hat and long beard, lol
So i decided to give this smoke photography a go and it turned out not so bad. Here's how i shot these photos with my D90 and what you'll need.
First I stopped by the fabric store and bought a yard and a half of black fabric for the background. Then I stopped at a smoke shop and got some incense sticks to use for the smoke. When i got home i waited until it was dark outside and went to work. I set the black fabric material up behind the table I was using, (make sure you set the background back pretty far because you don't want any light to hit it) next I stuck the incense stick in some wax and put it on a plate on the table.
Now for the flash and light. I used my SB600 flash off camera in commander mode and dialed down the power to -3.0. Next was the tricky part, I made a cone with a black piece of 8x10 craft paper and slid it on the flash and aimed the cone at were the smoke would be. Again the reason for this was to try and keep the light from the flash off the background. Next i got out my little head lamp and aimed it also at the spot (opposite side from the flash) the smoke would be. This was so I could manual focus on the smoke I was shooting in the dark. (you can leave this light on the whole time your snapping pictures so you can focus.
Now that i got everything set up I was ready to set up the D90. I put on my Tamron 17-50 lens and set the camera to aperture priority and went with f/8 and F/11. Since I was shooting flash the shutter speed was auto at 200. I did not use a tripod which made things a lot easier.
I fired up the incense and started snapping away at the smoke and that was it basically. When I was done I deleted the bad ones and uploaded the good ones to Photoshop elements 6 and started working with them.
Use your invert button to get a white background and back to get the black background. To add color I used the hue and saturation slider and played with that. To add color to specific areas I used the selection command and while selected I used the hue and saturation which works great! Anyway that's it...I hope you give it a try I'm sure I'll be doing some more soon.

Here's a good site that explains more.

3 comments:
uau! Really nice !!!
Thank you!
Thank you for this post.
definitely will try this.
Post a Comment